Last summer, I saw a woman at the airport trying to get her anxious terrier into a small carrier. The security agents were getting impatient, and others were staring. It broke my heart because I knew how she felt.
I had been in her shoes before, trying to travel with my pet for the first time. It was a disaster. But I learned a lot from that experience.
I made this guide to help you avoid my mistakes. Whether you’re flying for the first time or the fiftieth, the right airline-approved products are key. I’ve researched and tested many carriers and products.
This guide covers everything from choosing the right carrier to getting through security. PetzVibes helped me gather these tips based on real experiences and airline rules. With these airline-approved products, flying with your pet can be smooth.
Key Takeaways
- Proper planning and the right gear make traveling alongside animals much easier and less stressful
- Airlines charge between $75-$200 for cabin animals, while cargo transport costs $200-$500 or more
- Choosing compliant carriers is essential—size restrictions vary by airline and must be followed exactly
- Your animal’s temperament, health, and anxiety levels determine whether air travel is appropriate
- TSA security procedures require specific preparation, but they’re manageable when you know what to expect
- Having veterinary-recommended products reduces stress for both you and your furry companion
Why I Always Start Preparing Weeks Before I Fly with My Pet
When the gate agent said my dog couldn’t board, I felt a lot of panic. This taught me a lot about pet travel preparation. I thought flying with my dog would be easy, but it’s much harder than I thought.
Now, I always give myself three weeks to prepare for a pet-friendly flight. This has made my travel experience much better.
The Stressful Truth About Last-Minute Pet Travel
Preparing for a flight with your pet at the last minute can cause big problems. Airlines have limits on pets in the cabin, and spots fill up fast. If you wait too long, you might not be able to bring your pet.
Many pet owners find out at check-in that their carrier doesn’t meet airline pet policies. The agent will measure it right there. If it’s too big, your pet can’t fly with you.
Not giving your pet time to get used to their carrier is a big mistake. A scared pet in a small space is bad for everyone on the plane. Advance planning lets your pet get used to the carrier slowly.
Health certificates are another big problem. Most airlines need a vet document within 10 days. If you wait too long, you might miss this deadline. International flights need even more paperwork, which can take weeks.
What I Learned from My First Flight with My Dog
My first flight with my dog was a disaster. I booked the flight and told the agent I’d bring my dog. I thought it would be fine to just show up with my dog in any carrier.
Three days before my flight, I realized how much I needed to do. My carrier was too tall, and my dog’s rabies shot was expired. I hadn’t even thought about how my dog would handle being in a carrier for hours.
I spent those three days in panic. I looked for an approved carrier at three pet stores. I begged my vet for an emergency appointment to update vaccinations and get the health certificate. My dog had never been in a carrier for more than five minutes, and now he’d have to stay inside for six hours.
The flight was even worse than I feared. My dog whined a lot during takeoff. He had an accident in the carrier because I didn’t know about the feeding restrictions before flights. Other passengers looked at me angrily. I felt terrible for putting him through that stress.
That experience taught me that pet travel preparation is essential. It’s not just about getting there; it’s about your pet’s wellbeing and your peace of mind. I vowed never to cut corners again.
The Three-Week Preparation Timeline That Actually Works
After my mistakes, I created a three-week plan. This ensures nothing is forgotten and gives you and your pet time to prepare.
Here’s how I break down my preparation schedule:
| Week | Focus Area | Key Tasks |
|---|---|---|
| Week 1 | Research & Booking | Review airline pet policies, confirm pet spots available, order airline-approved carrier, research destination pet requirements |
| Week 2 | Health & Training | Schedule vet appointment for health certificate, update vaccinations if needed, start carrier acclimation training daily, discuss anxiety options with vet |
| Week 3 | Final Preparations | Collect all required documents, pack pet travel supplies, practice airport scenarios, confirm everything with airline 48 hours before departure |
Week One is all about research and getting the right equipment. I read through airline pet policies and check carrier sizes. I also book my pet’s flight spot early, as they fill up quickly.
In this first week, I order my carrier and other travel gear. This gives me time for shipping and ensures I can return items if needed. I also research pet rules at my destination, including local laws and health concerns.
Week Two focuses on health and comfort. I schedule my vet appointment for the health certificate and to update vaccinations. This timing is good because health certificates must be within 10 days of travel.
This week, I start serious carrier training. I place the carrier in my living room with treats inside. Each day, I increase the time he spends inside, making it a comfortable space.
Week Three brings everything together. I organize my documents and pack my pet’s travel bag. I also practice runs to simulate the flight motion.
Two days before departure, I confirm my pet’s reservation with the airline. This simple step has saved me from last-minute surprises many times. Airlines sometimes have system glitches that drop pet reservations.
This three-week plan has changed my pet travel approach. Instead of stressing, I’m confident and prepared. My dog is calmer, and I catch any problems early.
For detailed checklists and printable guides, I use petzvibes.com. Having everything written down helps me remember every step, even when busy.
Proper advance planning makes a huge difference. Your pet deserves the extra time and care. Trust me, those three weeks will make your travel day much smoother.
Understanding Airline Pet Policies: What I Wish I Knew Sooner
I’ll never forget standing at the Delta counter, watching my carefully planned trip unravel. My carrier was half an inch too tall, and I faced a choice. Either leave my dog behind or pay $150 for a new carrier at the airport shop. That expensive lesson taught me that airline pet policies aren’t just guidelines—they’re strictly enforced rules that can derail your entire trip.
Every airline handles pet travel differently. Some welcome pets with open arms, while others make the process feel like navigating a maze of restrictions and fees.
I’ve flown with my pets on multiple carriers, learning that understanding these policies ahead of time is key. It’s as important as packing the right gear.
How Delta, American, United, and Southwest Compare
The first time I tried comparing major airline policies, I spent hours bouncing between different airline websites. Each carrier structures their pet information differently, making side-by-side comparison nearly impossible without creating my own chart.
After booking flights with four different airlines, I discovered that the differences go far beyond just price. Some airlines restrict certain breeds entirely, while others limit the number of pets allowed on each flight.
The variation in pet travel regulations surprised me the most. For example, Southwest doesn’t accept pets in cargo at all, only in-cabin. United offers PetSafe for larger animals that need to travel in the cargo hold.
I created this comparison table based on my research and personal experience with these carriers:
| Airline | In-Cabin Fee (One-Way) | Cargo Available | Weight Limit (Pet + Carrier) | International Pet Travel |
|---|---|---|---|---|
| Delta | $95 domestic, $200 international | Yes (limited routes) | 20 lbs | Yes, with restrictions |
| American Airlines | $150 domestic/international | Yes (seasonal blackouts) | 20 lbs | Yes, varies by country |
| United | $125 domestic/international | Yes (PetSafe program) | 20 lbs | Yes, extensive options |
| Southwest | $95 each way | No cargo option | 20 lbs | No international flights |
These airline pet fees represent current pricing as of 2024. I always recommend checking directly with the carrier before booking. Prices change, and some airlines add extra charges during peak travel seasons.
One thing I appreciate about Delta is their detailed pet policy page. It clearly outlines breed restrictions. American Airlines has helpful customer service representatives who walked me through the booking process when I had questions about connecting flights.
Southwest wins for simplicity—their straightforward approach means fewer surprises at the airport. But if you’re planning international pet travel, you’ll need to choose a different carrier. Southwest only operates domestic routes.
The Size and Weight Rules That Catch Everyone Off Guard
Here’s what nobody told me before my first flight: the 20-pound weight limit includes your pet AND the carrier combined. I had assumed airlines only weighed the pet, so when my 18-pound dog plus his 4-pound carrier exceeded the limit, I faced a serious problem.
The size restrictions confused me even more. Airlines list maximum carrier dimensions, but those measurements must fit under the seat in front of you. Different aircraft have different under-seat spaces.
I learned this the hard way on a regional jet where the under-seat clearance was two inches shorter than on the Boeing 737 I usually flew. My carrier technically met the airline’s listed dimensions, but it didn’t fit under that particular seat.
The key to success is measuring your specific aircraft’s under-seat dimensions before your flight, not just relying on the general guidelines.
Soft-sided carriers give you more flexibility than hard-sided ones. The flexible material can compress slightly to fit into tight spaces, which has saved me more than once during boarding.
Pet travel regulations also specify that your pet must be able to stand up, turn around, and lie down comfortably inside the carrier. Gate agents do check this, and I’ve seen passengers denied boarding when their carrier was clearly too small.
For larger dogs that can’t meet cabin requirements, cargo travel becomes the only option. Cargo pets travel in climate-controlled holds, but the rules get even more complex. Temperature restrictions prevent cargo pet travel when it’s too hot or too cold at either your departure or arrival city.
Booking Your Pet’s Spot and What It Really Costs
Most airlines limit the number of pets allowed in the cabin on each flight—usually between four and seven total. This means you can’t just book your ticket online and assume there’s room for your pet.
I always call the airline directly after booking my own seat. The reservation agents have access to the pet count for each flight and can officially add your pet to the manifest. Some airlines now allow online pet booking, but calling gives me peace of mind that everything is properly documented.
The booking process typically goes like this:
- Book your own ticket first (online or by phone)
- Call the airline’s customer service within 24 hours
- Request to add a pet in cabin to your reservation
- Provide your pet’s weight and carrier dimensions
- Pay the non-refundable pet fee
- Receive confirmation with your pet’s reservation number
Those airline pet fees are just the beginning of your actual costs. When I budget for pet travel now, I factor in multiple expenses that add up quickly.
A quality airline-approved carrier runs between $50 and $150 for most dogs and cats. If you’re flying internationally or need a larger carrier for cargo travel, expect to spend $200 to $300.
Health certificates required by airlines cost me anywhere from $50 to $200 depending on my vet’s fees. These certificates must be issued within 10 days of travel for domestic flights, and requirements get stricter for international destinations.
International pet travel brings additional costs like import permits, microchip registration, and sometimes mandatory quarantine fees. When I flew to the UK with my dog, the total cost exceeded $1,000 after factoring in all requirements.
Don’t forget about pet fees at your destination hotel—most charge between $25 and $75 per night. Some airports also charge fees if you need to use their pet relief areas during layovers.
I keep detailed records of all pet travel expenses because some costs qualify as tax deductions if you’re traveling for work. For more information about current airline policies and helpful cost calculators, I regularly check resources at https://petzvibes.com to stay updated on any policy changes.
The investment in understanding major airline policies upfront saves you from costly mistakes at the airport. Taking time to research and properly book your pet’s travel makes the entire experience smoother for everyone involved.
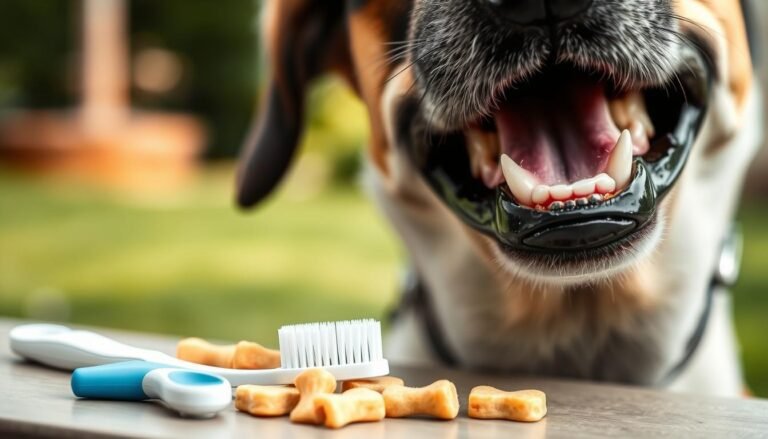
The Best Airline-Approved Pet Carriers I’ve Tested and Trust
I’ve tested over a dozen pet carriers on more than twenty flights. I know which ones work best. The right carrier keeps your pet comfortable, safe, and calm during travel.
Finding the best pet carriers took years. I’ve tried many, facing issues like collapsed carriers and anxious pets. But some carriers stand out as the best.
I’ve used these carriers in real airport scenarios. They’ve passed tests on different airlines and with various pets. Here’s what I’ve learned about the best airline-approved carriers.
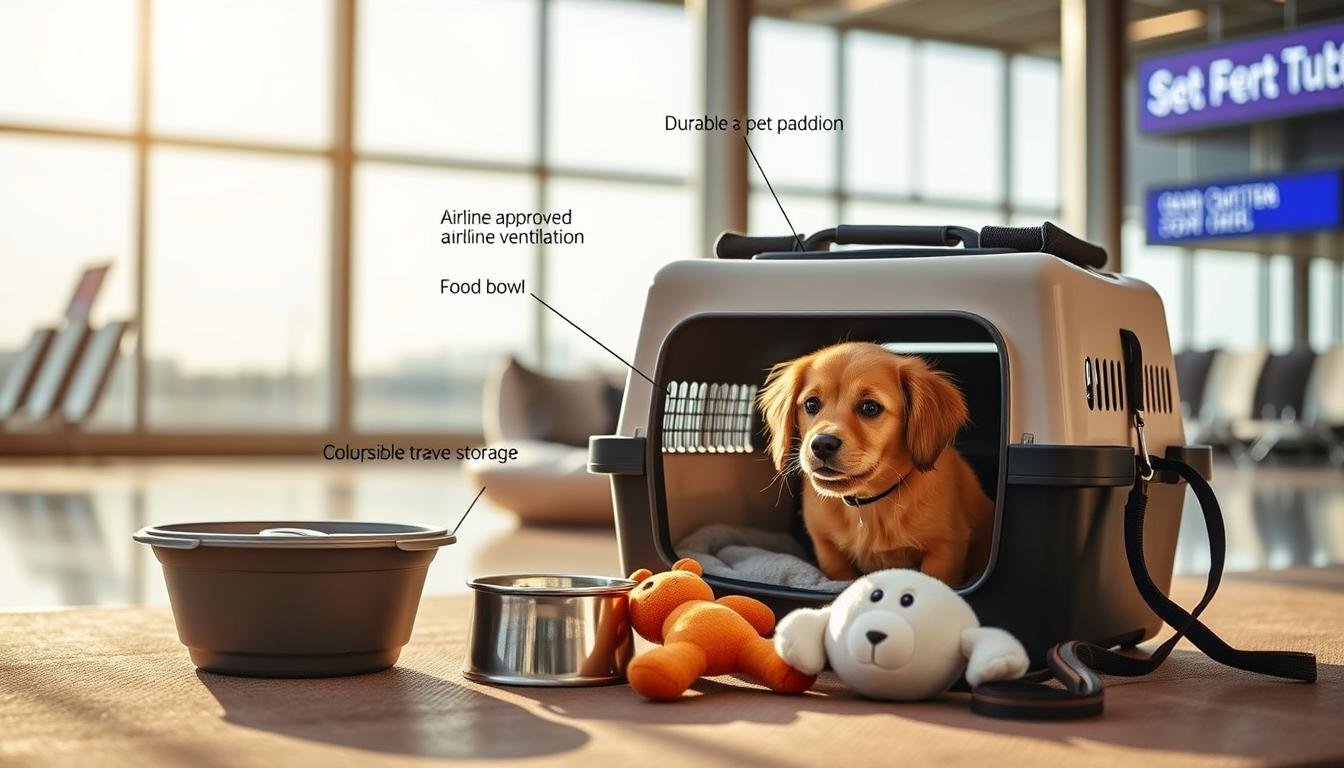
Sherpa Original Deluxe Airline-Approved Pet Carrier
The Sherpa Original Deluxe is my go-to for cabin travel. It’s soft but sturdy, fitting under seats and giving pets room to move.
Its design is thoughtful. Mesh panels on three sides let pets see their owners, reducing travel anxiety.
My anxious rescue dog settled down quickly in the Sherpa. Seeing me through the mesh panels seemed to calm her.
The carrier’s frame is spring-wire, keeping its shape but not too rigid. It fits under seats on all types of aircraft.
The shoulder strap is comfortable, even for long walks. It has pockets for treats and documents, making security checks easier.
The fleece liner is washable, making cleaning up easy. This feature has saved me many times.
Sleepypod Mobile Pet Bed Carrier
The Sleepypod Mobile Pet Bed is top-notch for safety. It’s crash-tested and meets high standards.
It doubles as a pet bed, making travel less stressful. My dog loves it at home and during travel.
The Crash-Tested Option for Extra Safety
The Sleepypod has been crash-tested at 30 mph. It’s safe for car travel and gives me peace of mind.
Its design absorbs impact and has mesh windows for visibility and ventilation. My dog stays calm during turbulence.
Setting up the Sleepypod is easy. It expands from a bed to a carrier with a zipper. It’s a familiar spot for my dog at destinations.
This carrier is best for pets up to 15 pounds. It fits under most seats but can be tight on smaller jets. It’s a premium choice for safety.
Petmate Two Door Top Load Pet Kennel
The Petmate Two Door Top Load is for cargo travel and larger dogs. It meets IATA requirements and is approved by major airlines.
I’ve used it for a 45-pound retriever mix. It’s held up well on multiple flights, including international ones.
Best for Cargo Hold and Larger Dogs
The Petmate is heavy-duty and secure. Its wire door has a secure latch, preventing escapes. I add extra zip ties for safety.
Ventilation is key in cargo kennels. The Petmate has wire ventilation and slots for airflow. It meets airline ventilation standards.
The top-loading door is great for anxious dogs. It makes pre-flight prep less stressful for both of us.
Sizing is important for hard-sided kennels. Your dog should fit comfortably inside. The Petmate comes in sizes for dogs up to 90 pounds.
The Petmate is affordable, priced between $40 and $120. It’s a good choice for budget-conscious travelers needing cargo-compliant kennels.
I add absorbent pads and a frozen water bottle to the kennel. A worn t-shirt with my scent comforts my dog. For more on preparing your kennel, visit petzvibes.com.
What Actually Makes a Carrier TSA-Compliant
TSA compliance can be confusing. Knowing the rules helps you choose the right carrier and avoid delays.
Carriers must fit through X-ray machines or be carried through metal detectors. Most soft-sided carriers fit, but some hard-sided ones don’t.
I’ve gone through the carry-your-pet procedure many times. TSA agents will ask you to remove your pet and walk through the metal detector. Make sure your pet wears a secure harness and leash.
Proper ventilation is mandatory for TSA approval. Carriers need airflow through mesh panels or holes. The TSA checks this to ensure pets breathe comfortably during screening.
Secure closures are important. Zippers should lock, and latches must fasten reliably. I’ve seen carriers rejected for broken zippers.
The bottom must be leak-proof and stable. Line it with absorbent pads, but ensure the base is solid. TSA agents can refuse carriers that appear unsanitary or structurally unsound.
Arrive early, have your pet’s carrier easily accessible, wear your pet’s leash before security, and stay calm. Your pet picks up on your stress, so confidence helps everyone move through faster.
- Remove metal accessories like food bowls before screening
- Keep treats in your pocket, not inside the carrier
- Have your pet’s documents ready but outside the carrier
- Consider TSA PreCheck to expedite the process
- Practice the security procedure at home before your flight
Every carrier I’ve recommended meets TSA requirements. The Sherpa and Sleepypod excel at airport security. The Petmate kennel goes through cargo screening.
Choosing a carrier depends on your pet’s size, your airline’s policies, and whether you’re flying cabin or cargo. I use the Sherpa for cabin travel and the Petmate for hard-sided protection. Test your carrier thoroughly before your first flight to ensure confidence for both you and your pet.
Comfort Items That Keep My Pet Calm at 30,000 Feet
Seeing your pet shake at 30,000 feet is heartbreaking. That’s why comfort items are as important as the carrier itself. On my first flight with Luna, I forgot the most important thing—something that smelled like home. She whimpered for two hours, and I felt helpless.
That flight taught me a lot about flying with pets. A few comfort items can make a big difference. They help your pet feel safe in a new place. These items are not just extras; they’re essential for a calm flight.
I’ve learned which comfort items are most important. After many successful flights, I know the right mix of items makes a big difference.
Bringing a Piece of Home: Blankets with Familiar Scents
Your pet’s sense of smell is very strong. It’s their main way to understand the world. That’s why bringing a blanket that smells like home is key.
I never wash my pet’s favorite blanket before a flight. It carries our scents and the smell of home. I sleep with it for a few nights before travel to make sure it smells like me.
Choosing the right size blanket is important. It should fit in the carrier without taking up too much space. I recommend a 24×30 inch blanket for small pets.
Material is also key. Avoid heavy blankets that can make your pet too hot. I prefer lightweight cotton or microfiber blankets that keep your pet comfortable without overheating.
Paw Inspired Puppy Pads for Accident Prevention
Accidents can happen, even with well-trained pets. That’s why absorbent pads are a must.
I use Paw Inspired Puppy Pads because they’re thin and absorbent. They fit in the carrier without taking up too much space. They’re also good at controlling odors.
I layer the puppy pad and blanket in the carrier. If there’s an accident, I can quickly change the blanket. This keeps the carrier clean and your pet comfortable.
I always carry extra pads in my bag. Delays and cancellations can happen, and having extra pads means you’re prepared.
| Comfort Item | Primary Benefit | Packing Priority | Space Required |
|---|---|---|---|
| Familiar Blanket | Scent comfort reduces anxiety | Essential | Minimal |
| Absorbent Pads | Accident prevention and cleanup | Essential | Minimal |
| Small Soft Toys | Distraction and comfort | Recommended | Very Small |
| Chew Toys | Stress relief through chewing | Optional | Very Small |
Small Toys That Pass Security and Fit in Carriers
Not all toys are good for flying. I learned this when TSA checked my dog’s toys. Choose small, soft toys that won’t bother others or cause security issues.
I pick toys that are 4-5 inches or smaller. They should be familiar to your pet. This helps distract them from the flight’s stress.
Avoid toys with squeakers or small parts. They can be a nuisance or a safety risk. Stick to simple toys that won’t cause problems.
My favorite travel toys are rope toys, plush toys, and rubber chew toys. They’re easy to get through security and don’t take up much space. I carry two toys: one in the carrier and one in my bag.
Introduce new toys at home before the flight. This makes them familiar and comforting for your pet. It’s a simple step that makes a big difference.
Security checks are usually easy with soft toys. But, it’s always better to keep toys simple and small. This way, you avoid any issues at security.
Having the right comfort items makes a big difference. They address your pet’s emotional and physical needs. I’ve seen my pets go from anxious to calm with these items.
Remember, comfort items are not about spoiling your pet. They help manage stress and anxiety for everyone. A calm pet means a calmer flight for you and others. For more tips and product reviews, visit petzvibes.com.
Organizing Travel Documents: My System for Stress-Free Check-Ins
At the airport, I was anxious about my dog and couldn’t find his health certificate. This taught me the importance of organization in pet travel. It’s not just about having the right documents; it’s about having them ready and easily accessible.
Understanding the need for pet travel documentation is key. It’s just as important as your own travel documents. Airlines are strict, and missing a document can mean your pet can’t fly.
That first trip taught me a lot. I now have a system that keeps me calm and makes check-in smooth.
Why I Keep Everything in a Clear Document Pouch
After my first trip, I bought a clear, waterproof document holder. It’s been a game-changer. The clear material lets TSA and airline staff see my documents without me having to dig through bags.
This speeds up the check-in process. The water-resistant feature keeps my pet health certificates for flying safe from spills and rain.
I organize my documents in a specific order. The airline confirmation is first, followed by the health certificate, vaccination records, emergency vet contact, and photocopies as backup.
“Proper documentation is the difference between a smooth journey and a travel nightmare. Always carry originals plus copies, and keep them accessible.”
The pouch I use is 9×12 inches. It’s big enough for standard papers but small enough to fit in my bag’s pocket. I can get to it quickly without digging through my bag.
The Exact Papers I Carry for Domestic and International Flights
Domestic and international pet travel have different requirements. For international flights, missing a document can mean quarantine or refusal of entry.
For domestic flights, I carry a specific set of papers. This list covers all bases and prevents any check-in problems.
Here’s my complete domestic travel document checklist:
- Airline booking confirmation showing pet reservation and fee payment
- Health certificate issued by a licensed veterinarian within 10 days of travel
- Current rabies vaccination certificate with expiration date clearly visible
- Prescription medication information with veterinarian contact details
- Emergency contact card with friend or family member who can take your pet
- Pet’s microchip number and registration information
International pet travel requires more documents. I start gathering these papers three months before departure. Some countries have waiting periods after vaccinations or treatments.
| Document Type | Domestic Flights | International Flights | Timing Required |
|---|---|---|---|
| Health Certificate | Required (10 days) | Required (10 days) | Within 10 days of travel |
| Rabies Vaccination | Required (current) | Required (current + waiting period) | 21-30 days before travel |
| Pet Passport | Not required | Required for most countries | 3-4 months advance |
| Microchip Certification | Recommended | Required (ISO-compliant) | Before health certificate |
| Import Permit | Not required | Required for some countries | 2-3 months advance |
Pet passports are essential for international travel. They include all medical history, vaccinations, and treatments.
I always check the specific requirements for my destination country. Some countries require tapeworm treatment or blood titer tests for rabies antibodies.
Once, my document pouch fell out of my bag during a layover. I had digital backups saved on Google Drive, Dropbox, and my email. This meant I could show airline staff the documents while I retrieved my pouch from lost and found.
Best Travel Document Organizers from Amazon Basics
I’ve tested many document organizers for different travel situations. The right one depends on the number of pets and the destination.
The Amazon Basics Clear Document Folder with Zipper is great for single-pet domestic travel. It’s around $8, holds standard papers, and the clear material lets TSA see contents. The zipper keeps everything in place during airport rushes.
For international trips, I use the Amazon Basics Expanding File Folder. It has multiple compartments for different documents. I separate airline paperwork, health certificates, and backup copies.
After a coffee spill nearly ruined my dog’s health certificate, I look for waterproof organizers. The water-resistant coating or sealed edges protect papers from damage.
When traveling with two pets, I use color-coded organizers. This prevents me from handing the wrong paperwork to the airline agent during check-in.
I also recommend a wrist strap attachment if your organizer supports it. It makes navigating security checkpoints easier while managing a carrier, leash, and bags.
Visit petzvibes.com for downloadable checklists and printable templates for organizing your pet travel paperwork. These resources save me hours of research and ensure I never forget a critical document.
My document organization system has made pet travel routine and stress-free. Investing in a quality organizer and organizing paperwork before each trip has eliminated my check-in stress.
Portable Food and Water Gear for Long Airport Days
Last November, I sat at gate B17 watching a six-hour flight delay tick by. I was grateful for every piece of portable pet feeding gear in my carry-on. My golden retriever Max needed water every couple of hours. I watched other pet parents desperately searching for water fountains or asking flight attendants for cups.
That experience taught me that proper feeding and hydration equipment isn’t just convenient—it’s absolutely essential for pet-friendly travel.
Airport days rarely go as planned. Delays, long security lines, and extended layovers can turn a simple trip into an endurance test for you and your pet.
Having the right travel essentials for pets means your furry companion stays comfortable and healthy no matter what surprises the day brings. I’ve tested dozens of products over the years, and these are the ones that have never let me down.

Compact Silicone Bowls That Collapse Flat
The Comsun Collapsible Silicone Travel Bowls transformed how I handle airport pet care. These genius bowls collapse completely flat—about the thickness of two credit cards—yet expand to hold a full cup of water or food when needed.
I keep two in my travel bag at all times. One stays dedicated to water, the other to food, and they weigh practically nothing.
The food-grade silicone material is completely safe for pets and stands up to daily use without cracking or tearing. I’ve put mine through the dishwasher hundreds of times, and they look brand new. Each bowl features a handy carabiner clip that attaches to your bag, so you’ll never dig frantically through luggage searching for them.
During layovers, I use these bowls in designated pet relief areas. But here’s a trick I’ve learned: when my pet is in the carrier at the gate, I can carefully open the carrier door just enough to slip a small bowl of water inside. This gives Max a drink without fully removing him from his carrier, which some airlines frown upon in crowded gate areas.
The bowls come in multiple sizes. I recommend the medium size for dogs under 50 pounds and the large for bigger breeds. For cats or small dogs, the small size works perfectly and takes up even less space.
Water Bottles Designed for Dogs on the Go
Lixit Flip Top Water Bottles for Dogs solved a problem I didn’t know I had until I found them. Regular water bottles are useless when your dog can’t drink from them, and trying to pour water into your cupped hands is messy and wasteful.
These bottles feature a flip-top design with an attached drinking tray. You flip open the top, squeeze the bottle, and water fills the small tray where your dog can lap it up easily. Any water your pet doesn’t drink goes back into the bottle when you close the lid—nothing gets wasted.
I use the 20-ounce size for flights under four hours and the 32-ounce for longer trips or hot weather travel. The leak-proof design means I can toss it in my bag without worrying about soaking my documents or electronics.
The real advantage shows up in pet relief areas. Instead of searching for a water fountain or asking airport staff for water, I have everything I need right in my hand. Max drinks eagerly from the attached tray, and I can monitor exactly how much water he’s consuming throughout our travel day.
For pet-friendly travel during summer months, I fill the bottle halfway and freeze it overnight. By morning, I top it off with fresh water, giving me ice-cold water that stays cool for hours—perfect for keeping pets hydrated during hot airport waits.
Airtight Containers for Pre-Portioned Meals
OXO Good Grips POP Containers revolutionized my pet food packing system. These airtight containers keep food fresh, prevent odors from escaping into your luggage, and make portion control incredibly simple.
Before each trip, I measure out exact portions of Max’s food into these containers. Pre-portioning prevents overfeeding, which is critical because a too-full stomach during travel often leads to accidents or discomfort.
I use the small rectangular containers (0.5 quart) for treats and the medium size (1.7 quart) for full meals. The push-button mechanism creates a true airtight seal with just one touch, and the clear sides let me see exactly what’s inside without opening them.
These containers aren’t just for kibble. I pack small training treats that I use to reward calm behavior during security checks and boarding. Having treats readily accessible in an easy-open container makes positive reinforcement simple, even when juggling bags, tickets, and a pet carrier.
The containers stack neatly, saving precious space in carry-on luggage. For overnight trips, I pack enough for the travel day plus one extra meal in case of unexpected delays. More details about travel-friendly pet food options and feeding schedules can help you plan exactly what to pack.
Smart Feeding Practices During Layovers
My feeding strategy during airport days comes from years of trial and error, plus advice from my veterinarian. The golden rule is feeding a light meal 3-4 hours before departure. This timing allows for complete digestion and necessary bathroom breaks before boarding.
I never feed Max a full meal right before travel. Instead, he gets about half his normal breakfast portion, then nothing but water until we reach our destination. This approach dramatically reduces the risk of motion sickness and in-carrier accidents.
During flights, I offer only water—no food or treats. The confined space and stress of flying can upset sensitive stomachs, and the last thing anyone wants is a sick pet at 30,000 feet.
For layovers longer than four hours, my approach changes. I’ll offer a small handful of treats or about one-quarter of a regular meal in a designated pet relief area. This keeps energy levels stable without overloading the digestive system.
Here’s the ice cube trick that cargo pet travelers swear by: freeze water in your pet’s carrier bowl before travel. As the ice melts gradually, your pet has access to water throughout the journey without the risk of spills during loading and turbulence. I use this method even for cabin travel when I know we face a long day.
I always maintain feeding schedules as close to normal as possible. If Max typically eats at 7 AM and 6 PM, I plan travel around those times or adjust gradually in the days before departure. Sudden schedule changes add unnecessary stress to an already stressful situation.
| Travel Scenario | Feeding Approach | Water Access | Recommended Gear |
|---|---|---|---|
| Short flight (under 3 hours) | Light meal 3-4 hours before departure, no food during travel | Water offered before security and after landing | Collapsible bowl, small water bottle |
| Long flight (3-6 hours) | Half portion 4 hours before, small treats during layover if applicable | Water every 2-3 hours in relief areas | Flip-top water bottle, both bowls, treat container |
| Full day with layovers (6+ hours) | Quarter portions at 4-hour intervals in pet relief areas | Water access every 2 hours | Complete kit plus backup meal in airtight container |
| Overnight travel | Normal feeding schedule with pre-portioned meals for each time | Regular water access throughout journey | Multiple containers, frozen water bottle, extra bowls |
I also pack backup supplies for unexpected situations. An extra meal’s worth of food and additional water have saved me more than once when flights got cancelled or severe delays pushed our arrival time past normal feeding hours.
Temperature matters too. During summer travel, I focus heavily on hydration and offer water more frequently. In winter, I’m less concerned about overheating but maintain regular water access.
Every pet is different, so I recommend testing your feeding strategy on shorter trips before attempting longer journeys. Watch for signs of stress, thirst, or hunger, and adjust your approach based on your pet’s individual needs. The goal is keeping them comfortable and healthy throughout the entire travel experience.
These travel essentials for pets have become non-negotiable items in my carry-on. Between the collapsible bowls, specialized water bottles, and airtight food containers, I’m prepared for any situation an airport day throws at us. Combined with a smart feeding strategy, Max arrives at every destination happy, healthy, and ready for adventure.
Pet Trackers and ID Tags: My Safety Net for Travel Anxiety
I remember a story about a dog that escaped during a layover. This fear shapes my travel prep. The owner searched for hours, and their pet was scared and alone.
Technology has changed pet safety during travel a lot. I use both modern tracking and old-school ID tags. This mix is the best way to keep my pet safe.
Apple AirTag in a Catalyst Waterproof Case
The Apple AirTag has changed how I travel with my pets. I put one on my dog’s collar in a Catalyst Waterproof Case. Another goes inside the carrier, attached to the wall.
Real-time tracking through the Find My app gives me peace of mind. I can see my pet’s location from start to finish.
One moment made me realize these GPS pet trackers are worth it. During a layover in Chicago, I saw my dog’s carrier on the right flight. This stopped my anxiety and let me enjoy my coffee.
The Catalyst Waterproof Case is key because regular holders break easily. This case is tough, waterproof, and lasts a long time. The AirTag battery lasts a year and is easy to replace.
AirTags work best where there are other Apple devices. Airports and cities usually have good coverage, but remote areas might not.
Tile Pro Bluetooth Tracker for Real-Time Location
I found Tile Pro for tracking with my friend’s Android phone. It has some perks over AirTags.
The Tile Pro has a 400-foot range, much farther than AirTags. It also uses a network to find lost pets. This means I can find my pet from far away in big places.
I use an AirTag on my pet’s collar and a Tile Pro on the carrier. This way, I have two ways to track my pet. If one fails, I can find my pet with the other.
The Tile app works on both iPhone and Android. This is important when I’m coordinating with others who might have different phones. I can share the tracker so everyone can see where my pet is.
Road ID Personalized Pet Tags with Travel Contact Info
Even with all the tech, ID tags are key for pet identification. They’re the fastest way to get in touch if someone finds your pet.
I use two tags: a permanent one with my contact info and a travel tag with journey details. The travel tag has my phone number, hotel, and a backup contact.
Road ID tags are laser-engraved, so the info won’t fade. They’re also tough and won’t fall off easily. They can hold more info than regular tags, which is great for emergency contacts.
I always check that tags are secure and readable before the airport. A loose tag defeats the purpose during the chaos of security.
Why I Always Use Two Forms of Identification
I use multiple systems because each one can fail. This way, my pet stays safe even when one system fails.
The microchipping is permanent and can’t be lost. It has a unique number that connects to my info in a database. Many places require it for travel.
It’s important to update the microchip info before each trip. If the info is wrong, the chip is useless.
Collar tags are the most visible ID. They’re easy to use and can’t be ignored. But, they can fall off, so they’re not enough on their own.
Electronic trackers like AirTags and Tile give real-time updates. But, they need batteries and network to work. If they run out or lose signal, they stop working.
Together, these three systems cover all bases:
- Microchip: Permanent, can’t be lost, works worldwide with scanners
- Collar tags: Immediately visible, no equipment needed, fastest contact method
- Electronic trackers: Real-time location, proactive searching capability
Before every trip, I check my pet’s ID systems. I make sure the microchip info is up to date. I also test the electronic trackers to make sure they’re working.
This might seem like a lot, but pet safety during travel is worth it. Knowing my pet can be found and identified gives me peace of mind and lets me enjoy the trip.
For more info on updating microchip info and comparing tracking systems, check out PetzVibes.com. They have great resources to help you choose the best tracking for your pet.
Calming Products That Actually Work on Nervous Flyers
I remember my rescue dog shaking in her carrier before our first flight. This led me to find ways to help nervous pets travel. Her whole body trembled, she panted heavily, and her eyes showed panic.
What I learned is that pet anxiety during travel is normal and not something to feel guilty about. Some pets are naturally more anxious. It’s important to find safe, effective calming products for pets.
Anxious pets can hurt themselves trying to escape carriers. They can also develop negative associations with travel. I’ve tested many products and am sharing the ones that helped my anxious pet and others I know.
Pressure-Based Anxiety Wraps That Provide Comfort
The Thundershirt Classic Anxiety Wrap was a game-changer for my dog. It works by applying gentle, constant pressure, similar to swaddling a baby. This pressure can release calming hormones.
I introduced the wrap gradually over three weeks before our flight. She wore it during car rides, vet visits, and other stressful situations first.
By the time we flew, she associated the wrap with staying calm. Her shaking reduced, and her panting decreased. She was less anxious, but not completely calm.
Proper fitting is essential. The wrap should be snug but not restrictive. If it’s too loose, it won’t work. Too tight, and it becomes uncomfortable.
My dog can wear hers all day without issues. I put it on about 30 minutes before we leave for the airport and keep it on until we reach our destination.
Results vary by pet. Some dogs respond well, while others show little improvement. It works best when combined with other strategies.
| Product Feature | Thundershirt Classic | Application Time | Effectiveness Rating |
|---|---|---|---|
| Pressure Type | Gentle constant wrap | 30 min before stress | Moderate to High |
| Duration of Use | All day wear safe | Not just travel day | Best with training |
| Best Combined With | Pheromones and training | Gradual introduction | Multi-strategy approach |
Pheromone Sprays That Create Familiar Comfort
Adaptil Travel Calming Spray for Dogs uses synthetic pheromones. These signals tell dogs they’re safe. Veterinarians often recommend these products.
I spray it inside my dog’s carrier about 15 minutes before placing her inside. This gives the spray time to settle. The familiar “safe” signal helps her settle more quickly.
Pheromones are species-specific. Dog pheromones only work for dogs and have zero effect on cats or other animals. They’re completely safe with no side effects or drug interactions.
I set realistic expectations with this product. It takes the edge off anxiety but won’t eliminate severe fear completely. Think of it as turning the volume down on stress.
The travel spray format is perfect for flights. It’s TSA-compliant at under 3.4 ounces and doesn’t require diffusers or electricity. I keep mine in my carry-on and can reapply during layovers if needed.
Calming Solutions Designed Specificially for Cats
Feliway Travel Spray for Cats is the feline equivalent of Adaptil. It contains synthetic facial pheromones that cats naturally produce when they feel safe. Cats rub their faces on objects to mark territory and create comfort zones.
While I travel with dogs, I’ve talked to friends who fly with cats. They report that Feliway significantly reduces yowling and attempts to escape carriers. Veterinary behaviorists recommend it as a first-line intervention for travel anxiety in cats.
Cats often experience even more travel stress than dogs. They’re territorial creatures who prefer familiar environments. Anything that disrupts their sense of territory can trigger significant anxiety.
The spray application works the same as the dog version. Apply it to the carrier interior 15 minutes before placing your cat inside. The pheromone signal tells your cat this unfamiliar space is safe.
Supplement-Based Support for Behavioral Calm
VetriScience Composure Calming Chews contain ingredients like L-theanine, colostrum, and thiamine. These help support calm behavior naturally. I give these to my dog starting three days before travel and continuing through travel day.
They work best as part of a longer-term strategy. Building up these calming compounds in your pet’s system provides better results than expecting immediate effects.
Supplements aren’t FDA-regulated like medications. This means quality varies significantly between brands. I stick with reputable companies that conduct third-party testing and have veterinary endorsements.
My dog actually enjoys these chews. They taste good to her, which makes administration easy. I can give them as “treats” instead of fighting to get pills down her throat.
The key to successful anxiety management during travel is combining multiple strategies. Relying on any single product alone is not enough.
Knowing When Professional Veterinary Help Is Needed
For some severely anxious pets, over-the-counter solutions aren’t enough. I recommend veterinary consultation for prescription anxiety medication in these situations:
- Your pet has a history of severe anxiety or panic attacks
- They’ve shown aggressive behavior or self-harm when anxious
- Over-the-counter calming products for pets haven’t provided relief
- You’re planning a long or complex journey
My veterinarian prescribed trazodone for my dog before our first international flight. This medication helped reduce her anxiety to manageable levels without completely sedating her. We did a trial run at home first to ensure proper dosing and watch for side effects.
Here’s a critical safety rule: pets traveling in cargo cannot be sedated. Sedation affects their ability to regulate body temperature and can be dangerous at altitude. Airlines prohibit it for cargo travel, though cabin pets can use vet-prescribed medications.
I’m not a veterinarian and can’t provide medical advice. What I can share is that consulting my vet made a huge difference in our travel experience. We discussed my dog’s specific anxiety triggers and medical history to find the right solution.
There’s an important distinction to understand regarding service animals on flights versus regular pets. Service animals are working animals trained to perform specific tasks for people with disabilities. They’re allowed in cabins under different regulations than pets.
The situation with emotional support animals changed significantly in 2021. Most U.S. airlines no longer recognize emotional support animal status. These animals now travel as regular pets under standard airline policies and fees.
Understanding these distinctions prevents confusion at check-in. If you have a service animal, you’ll need proper documentation of their training and your disability. Regular pets and former emotional support animals follow the carrier and fee requirements I’ve discussed throughout this guide.
For more detailed information about managing pet anxiety during travel and preparing for veterinary consultations, visit petzvibes.com. They offer checklists and expert advice that complement the products I’ve recommended here.
Airport-Friendly Leashes and Harnesses I Never Travel Without
Nothing could have prepared me for the chaos of a lost dog in an airport terminal. That experience changed how I pack pet safety gear. A golden retriever two rows away backed out of his collar and ran across the terminal.
The owner’s face turned white as passengers tried to catch the dog near the windows. The ordeal ended safely, but it changed everything about my airport pet equipment.
I realized my standard walking gear wasn’t made for air travel. I’ve invested in specialized leashes and harnesses that I trust completely.
The right restraint system does more than prevent escapes. It gives you control in tight security lines and provides safety during bathroom breaks. It also offers peace of mind when your pet feels anxious.
I now travel with a three-tier system that covers every situation I might encounter.
Retractable Leash for Security Navigation
The Mighty Paw Retractable Dog Leash changed how I move through airports with my dog. Unlike my fixed six-foot walking leash, this retractable option gives me precise control over distance.
I can keep my dog within inches during crowded boarding lines. Then, I extend to sixteen feet at pet relief areas.
The TSA checkpoint became easier once I developed my system with this leash. I retract it fully and hold my dog close as we approach security. The carrier goes through the X-ray machine while I walk through the metal detector carrying my dog.
This backup attachment has saved me twice when my dog got squirmy. The leash stayed secure even though she wasn’t in my arms anymore. The tangle-free mechanism matters more than I expected because airport floors and crowds create plenty of opportunities for leash chaos.
I chose the sixteen-foot length for my forty-pound dog, but Mighty Paw offers options up to twenty-six feet for larger breeds. The comfortable grip reduces hand fatigue during long terminal walks. The locking mechanism clicks firmly at any length, which gives me confidence it won’t suddenly extend when I need control.
Escape-Proof Harness Design
The Ruffwear Web Master Harness is my non-negotiable piece of pet-friendly travel equipment after watching too many near-misses. My friend’s anxious rescue dog backed completely out of her regular collar at baggage claim.
That incident convinced me to upgrade to a multi-strap system that distributes pressure across the chest and body. This harness has five adjustment points, making it virtually impossible for dogs to slip out.
I’ve tested it with my own escape artist during stressful moments, and it holds firm every time. The design wraps around the chest, belly, and back, creating a secure fit that nervous dogs can’t wriggle free from.
What sets this harness apart are the two leash attachment points. The back attachment works perfectly for normal terminal walking, giving my dog freedom to move naturally. When we navigate crowded gate areas, I switch to the chest attachment for better directional control.
The padded construction keeps my dog comfortable even after hours of wear. Airport days are long, and thin straps can dig into skin and fur. The handle on the back has become my favorite feature for guiding my dog up stairs or lifting her quickly when needed.
Sizing runs true to manufacturer guidelines, but I recommend measuring your dog’s chest and length carefully. I spent extra time with the fitting process, and that investment paid off in security and comfort. The harness costs more than basic options, but the engineering and durability justify every dollar.
Eco-Friendly Backup System
My Lupine Eco Collar and Leash Combo serves as my backup set, and I never board a plane without it. Lupine offers a lifetime guarantee that covers even chew damage, which matters when you’re far from home. I keep this set in my carry-on bag as insurance against the unexpected.
The eco-friendly materials align with my values without sacrificing strength. These collars handle pulling and stress better than cheaper alternatives I’ve tried. I chose a bright pattern that’s distinctly different from my everyday collar, so I instantly know I’m using my travel set.
Proper collar fitting became critical after I learned the two-finger rule. The collar should be snug enough that only two fingers fit underneath, but not tighter. Too loose and dogs can slip out; too tight and it causes discomfort during long travel days.
I run a three-layer system for complete security. My primary Ruffwear harness with attached leash handles all airport activities. The Lupine collar with ID tags stays in my carry-on as backup. A second complete Lupine collar and leash set travels in my checked luggage.
This might seem excessive, but gear failures happen at the worst times. When you’re a thousand miles from home, having redundant travel gear for pets provides enormous peace of mind. The small extra weight and space are worth avoiding a possible disaster.
| Product | Primary Use | Key Feature | Price Range | My Rating |
|---|---|---|---|---|
| Mighty Paw Retractable Leash | Security lines and relief areas | Variable length control up to 16 feet | $25-$35 | 4.5/5 |
| Ruffwear Web Master Harness | Primary airport navigation | Five-point adjustment prevents escape | $80-$100 | 5/5 |
| Lupine Eco Collar & Leash | Backup and identification | Lifetime guarantee including chew damage | $30-$45 | 4.5/5 |
Safety checks became part of my pre-travel routine after I found a frayed leash clip the night before a flight. I now inspect every piece of airport pet equipment three days before departure. I check all clips, buckles, and stitching for wear, damage, or weakness.
Anything questionable gets replaced immediately, no matter how recently I bought it. The stress of travel puts extra strain on gear, and I won’t risk a failure in a crowded terminal. I also practice with all equipment at home before actual travel days.
My dog needs to feel comfortable in her harness before we face airport chaos. We take neighborhood walks with travel gear for a week before flying. This familiarization reduces her stress and helps me identify any fit issues while I can make adjustments.
The investment in quality leashes and harnesses has paid dividends in reduced anxiety and increased safety. I sleep better knowing my dog is secured with equipment I’ve tested extensively. For detailed guides on fitting harnesses and choosing appropriate leash lengths for different pet sizes, I always reference petzvibes.com.
Your pet’s safety during pet-friendly travel depends heavily on equipment quality. The few extra dollars for proven brands and designs are nothing compared to the peace of mind they provide. Every secure checkpoint passage and calm gate wait reinforces that these tools are essential investments, not optional accessories.
My Favorite Apps and Booking Tools for Pet-Friendly Travel
Using digital tools has saved me a lot of time and money on pet travel. What used to take hours now takes just minutes. I’ve tested many apps and tools, and I’ve found five that make traveling with pets easier and cheaper.
These apps make planning trips a breeze. I can find pet-friendly hotels, organize my itinerary, access health records, and even earn cash back. They’re not just helpful extras; they’re essential for every trip with my pet.
BringFido: Finding Pet-Friendly Hotels and Activities
BringFido is like Yelp for pet travel. It has a huge database of pet-friendly hotels, restaurants, attractions, and activities worldwide. Just enter your destination, and you’ll see all the options with details on pet policies and fees.
What makes BringFido stand out are the real reviews from other pet owners. They share important details that hotels don’t mention, like the location of pet-friendly rooms or hidden fees.
I use BringFido’s “near me” feature to find pet-friendly spots when I’m already traveling. It also lets me filter for specific amenities like dog parks or pet concierge services. The airline policies section keeps me updated on travel rules.
Booking through BringFido often offers the same rates as booking directly. Sometimes, they even have special deals for pet travelers. You can find more pet travel resources and app updates at https://petzvibes.com.
Emergency Pet Care Through Rover and Wag
Rover and Wag are great for finding local pet care when you’re away. They connect you with dog walkers, sitters, and boarding facilities. These apps are perfect for emergency care in new cities.
I once had a long meeting in Austin and my dog was stuck in the hotel room. I used Rover to find a walker who took him out for a walk. The walker sent me updates, and my dog was happy by the time I got back.
I’ve used these apps for more than just emergencies. They’re great for all-day conferences or evening events. You can book doggy daycare or arrange mid-day walks. Local sitters also give great recommendations for vet clinics and dog parks.
Using these apps is easy. Just enter your location, search for providers, and read reviews. Both platforms do background checks and offer insurance. They also have affiliate programs that support pet travel communities.
Organizing Everything with TripIt
TripIt is essential for managing complex itineraries, which is important for pet travel. I forward all my confirmation emails to TripIt, and it creates a master itinerary for me. It’s all in one place, and I can access it easily.
This is key for pet travel because you often need to reference multiple confirmation numbers. Airlines, hotels, and car rentals all have their own numbers. With TripIt, I don’t have to frantically search through emails.
The app works offline, which is a lifesaver. During flights or in areas with no service, I can access all my travel details. Gate numbers, hotel addresses, and rental car confirmations are all there.
I upgraded to TripIt Pro for real-time flight alerts and alternative flight suggestions. When traveling with pets, delays and cancellations can be stressful. The Pro version helps me make quick decisions by sending instant notifications and suggesting alternative flights.
PetDesk App for Accessing Vaccination Records Instantly
PetDesk is a vet clinic app that gives you digital access to your pet’s health records. If your vet uses this system, you can instantly view vaccination records, appointment history, and health certificates from your phone. No more worrying about losing important documents.
I had a situation at Denver International Airport where an airline agent questioned my dog’s rabies vaccine. The date on my printed certificate was smudged. I opened PetDesk, pulled up the official record, and showed the agent. The issue was resolved quickly.
Setting up PetDesk is simple if your vet participates. Ask your vet if they use PetDesk or a similar system. Download the app, create an account, and verify your identity. Your pet’s medical history will be accessible in minutes.
Even if your vet doesn’t use PetDesk, take photos of all health records and store them in your phone’s gallery. Create a folder called “Pet Health Records” for easy access. This backup system has been invaluable when I needed to reference information unexpectedly.
How I Use Rakuten and Honey to Earn Cash Back on Pet Travel Gear
Rakuten and Honey have helped me earn back hundreds of dollars on pet travel purchases. These platforms offer cash back and automatic coupon codes that reduce the cost of preparing for trips. I use both tools to save on everything from carriers to calming supplements.
Rakuten is a cash-back portal that pays you a percentage for shopping at hundreds of retailers. Before buying pet travel gear online, I check Rakuten first. I search for the retailer, click through to their site, and shop normally. The cash back tracks automatically, and I get paid quarterly.
The percentages vary by retailer and promotional periods. I’ve seen cash back rates from 2% up to 12% during special promotions. Over three years, I’ve earned over $200 in cash back, which covers several flights’ worth of pet fees.
Honey works differently as a browser extension that automatically searches for and applies coupon codes at checkout. I install the Honey extension, and when I’m ready to buy, Honey finds the best coupon codes. This saves me time and money, often finding discounts I wouldn’t have found myself.
I use both tools together for maximum savings. Rakuten gives me the cash back percentage, while Honey finds additional coupon codes. They work together seamlessly—I click through Rakuten, Honey finds the best codes, and I earn both the discount and the cash back.
Both services offer new user bonuses that provide extra cash back on your first purchase. Rakuten typically offers $10-$30 welcome bonuses, while Honey provides bonus points through their rewards program. These aren’t gimmicks—I genuinely use these tools for every online pet purchase because the savings add up significantly over time.
| App Name | Primary Function | Key Features | Cost | Best Used For |
|---|---|---|---|---|
| BringFido | Pet-friendly accommodation finder | 250,000+ listings, real reviews, policy details, activity recommendations | Free (booking commissions paid by hotels) | Finding and booking pet-friendly hotels and discovering activities |
| Rover/Wag | Pet care marketplace | Background-checked sitters, insurance coverage, photo updates, real-time booking | Service fees vary by booking (typically 15-20%) | Emergency pet care, dog walking, and daycare at destinations |
| TripIt | Travel itinerary organizer | Auto-imports confirmations, offline access, master timeline, Pro alerts available | Free basic / $49 annually for Pro | Organizing multiple reservations and accessing travel details offline |
| PetDesk | Pet health records access | Digital vaccination records, appointment history, prescription refills, vet messaging | Free (if your vet uses the platform) | Instantly accessing official health certificates and vaccination proof |
| Rakuten + Honey | Cash back and coupon tools | Automatic cash back, coupon code finder, quarterly payments, browser extension | Free (merchants pay commissions) | Earning money back on pet travel gear purchases and finding discounts |
I also want to be transparent about affiliate marketing in the pet travel space. Many apps and services offer referral programs that provide benefits to both the person sharing and the new user. When I recommend these tools, it’s because I genuinely use them and they’ve proven valuable in my own travel experience. Some links may provide me with small commissions, but that never influences which products I recommend.
In fact, earning modest affiliate income from pet travel recommendations has helped offset my own pet travel costs. I maintain updated comparison charts, tutorial videos, and current discount codes at https://petzvibes.com. The site serves as a central resource where I share real experiences with different booking tools and travel apps as new options emerge.
The combination of these five digital resources has fundamentally changed how I approach pet travel planning. Tasks that used to take hours now take minutes. Costs that used to add up now generate cash back. Information that used to require carrying folders of documents now lives on my phone. These aren’t luxury conveniences—they’re practical tools that make pet-friendly travel accessible and affordable for regular travelers like me.
My Carry-On Checklist: Everything I Pack for Peace of Mind
Every item in my pet travel carry-on has earned its place through trial, error, and dozens of flights. This isn’t a theoretical list of things you might need. It’s the exact pet travel checklist I use every single time I fly with my pet, refined through experience and real-world challenges.
When I first started traveling with my dog, I either packed way too much or forgot critical items. Now, I have a system that ensures I’m prepared for anything without turning my carry-on into an overstuffed mess. Everything I need fits in one personal item bag alongside my own essentials, and I can access any item within seconds.
The key to successful carry-on essentials for pets is organization and accessibility. I use packing cubes to separate pet supplies from my personal items, keep the most-needed things in outer pockets, and arrange everything so TSA screening goes smoothly. Nothing on this checklist goes in checked baggage because I might need any of these items during the flight or during unexpected delays.
The Non-Negotiable Items That Stay Within Reach
These are the items I absolutely will not board a plane without. Each one serves a specific purpose, and I’ve needed every single thing on this list at some point during my travels.
Here’s what always comes with me when I fly with my pet:
- All travel documents in a clear pouch: Health certificate, vaccination records, airline confirmation, and emergency contacts must be instantly accessible at check-in and security.
- Two full days of pet food in an airtight container: Delays happen, and finding your pet’s specific food brand in an unfamiliar city at midnight is nearly impossible.
- Collapsible water bowl and full water bottle: Hydration is critical during air travel, specially in low-humidity cabin environments.
- At least 20 waste bags in an easy-access pocket: You’ll need these before boarding, during layovers, and immediately after landing.
- Paper towels and pet-safe cleaning wipes: Accidents happen, specially during stressful travel situations.
- Pet’s medications with prescription labels: Include dosing instructions and enough for the entire trip plus two extra days.
- Comfort items like a familiar blanket and small toy: These provide emotional security in an unfamiliar environment.
- Several high-value treats: Perfect for rewarding calm behavior during stressful moments like security screening.
- At least three puppy pads: Essential for carrier accidents or emergency bathroom breaks in pet relief areas.
- Leash, harness, and backup collar: Redundancy is critical because a broken leash or lost collar creates dangerous situations.
- Recent photo of your pet on your phone: If you’re separated from your pet, having a current photo helps staff identify them quickly.
- Small first aid kit: Include gauze, antibiotic ointment, tweezers, and any pet-specific medical supplies your vet recommends.
- Calming products: Whether it’s a Thundershirt, pheromone spray, or calming chews, bring whatever works for your specific pet.
I organize these items using compression packing cubes, which keep everything compact and accessible. The most frequently needed items—waste bags, treats, water bowl—go in outer pockets where I can grab them without opening the entire bag.
Emergency Contact Cards and Vet Information
One aspect of pet travel preparation that many people overlook is creating emergency contact cards. These simple cards have given me tremendous peace of mind, knowing that if something happens to me, my pet will receive proper care.
I create laminated cards using business card templates that include the following information:
- My name and cell phone number
- Alternate emergency contact (family member or friend) with their phone and address
- My pet’s name, age, breed, and any medical conditions
- My home vet’s name, phone, and address
- My pet’s microchip number
- Any critical medication information
I keep one card attached to my pet’s carrier with a zip tie, one in my wallet, and one clipped to my pet’s collar. If I’m incapacitated or somehow separated from my pet during travel, anyone who finds them has immediate access to critical information.
I also save my vet’s contact information and the phone numbers for emergency veterinary clinics at my destination city in my phone before every trip. You can download a free emergency contact card template at https://petzvibes.com to create your own customized version.
Backup Supplies for Unexpected Delays or Cancellations
Travel rarely goes exactly as planned. I learned this lesson the hard way during a snowstorm that left me stranded overnight at an airport hotel with my dog and minimal supplies.
Ever after, I always pack backup supplies in my checked baggage. While these items aren’t in my carry-on, knowing they’re available if my trip extends unexpectedly provides significant peace of mind during pet travel preparation.
My backup supplies include:
- A full additional day of pet food beyond my carry-on supply
- At least six extra puppy pads
- A complete roll of 100 waste bags
- Backup collar and leash set
- Additional calming supplies
- Pet-safe cleaning spray for hotel accidents
- Copies of all important documents
I also keep my airline’s customer service number saved in my phone so I can quickly rebook flights if necessary. Having these backup supplies means I can properly care for my pet even if delays extend our travel far beyond original plans, without frantically searching unfamiliar cities for pet stores at odd hours.
Printable Checklist You Can Download
I’ve organized everything mentioned in this section into a complete, printable pet travel checklist that you can use for every trip. This checklist is divided into logical categories that make packing systematic and ensure nothing gets forgotten.
| Category | Essential Items | Backup Items (Checked Bag) |
|---|---|---|
| Documents | Health certificate, vaccination records, airline confirmation, emergency contacts | Photocopies of all documents |
| Food & Water | 2 days food, water bottle, collapsible bowl, treats | 1 additional day of food |
| Comfort & Calming | Familiar blanket, small toy, calming spray, Thundershirt, calming chews | Extra calming supplies |
| Safety & ID | Leash, harness, collar, emergency contact cards, recent photo, microchip info | Backup leash and collar |
| Clean-Up Supplies | 20+ waste bags, 3 puppy pads, paper towels, cleaning wipes | 100 waste bags, 6 puppy pads, cleaning spray |
| Emergency Items | Medications, first aid kit, vet contact info | Extra medications, document copies |
You can download a free PDF version of this complete checklist at https://petzvibes.com. The downloadable version includes spaces for adding personal items specific to your individual pet, such as special dietary requirements or breed-specific supplies.
I recommend printing the checklist, laminating it, and using it before every trip. Check off items as you pack them to ensure nothing gets left behind. While this list might seem extensive, every item has proven necessary at some point during my travels when I fly with my pet.
Being over-prepared with pets is always better than being under-prepared. The peace of mind that comes from knowing I have everything my pet might need is absolutely worth the extra packing effort. This systematic approach to carry-on essentials for pets has transformed my travel experience from stressful to manageable, and I’m confident it will do the same for you.
Conclusion
Traveling with pets on airplanes can seem daunting at first. I’ve been there too. My first flight with my dog was a mess. But now, I’m confident every time we fly.
Preparation is key. Start three weeks before your trip and learn airline rules inside out. Invest in good carriers and pack the right stuff. These steps made my pet travel smooth.
When flying with my pet, I’m ready with everything we need. I keep all documents in order. I use the right products to keep my pet calm. It works.
Many pet parents travel safely with their pets every day. You can too. Good gear and planning reduce stress and keep your pet safe.
Pet travel success is possible. Check out petzvibes.com for tips, guides, and product updates. Policies change, so stay informed.
Exploring new places with your pet is worth all the prep. Safe travels, and I’d love to hear about your adventures!
FAQ
Can I fly with my pet in the cabin, or does my dog have to go in cargo?
Whether you can fly with your pet in the cabin depends on their size and your airline’s policies. Most airlines allow small dogs and cats (typically under 20 pounds including the carrier) to travel in-cabin under the seat in front of you. I’ve flown with my small dog in-cabin on Delta, American, United, and Southwest, and each required the carrier to fit specific under-seat dimensions. Larger dogs must travel in the cargo hold in airline-approved hard-sided kennels like the Petmate Two Door Top Load Pet Kennel. I always recommend measuring your pet and researching your specific airline’s policies weeks before travel, as each carrier has different restrictions. Some airlines also have breed restrictions or seasonal embargoes during extreme temperatures that affect cargo travel. The key is booking your pet’s spot early—whether cabin or cargo—because airlines limit the number of pets per flight.
How much does it cost to fly with a pet on domestic flights?
Flying with a pet on domestic flights typically costs between and 0 each way as an airline pet fee, depending on the carrier. Southwest charges around , Delta charges -5, American charges 5, and United charges 5 each way for in-cabin pets. These fees are in addition to your own ticket and are non-refundable. Beyond the airline fee, I budget for the complete cost of pet travel: a quality airline-approved carrier (-0 depending on whether you need soft-sided like the Sherpa Original Deluxe or hard-sided like the Petmate kennel), veterinary health certificates (-0), updated vaccinations if needed, and potentially hotel pet fees at your destination (typically – per night). For a complete domestic trip, I typically spend 0-0 total on pet-related travel expenses. International flights can cost significantly more, sometimes 0-0 each way depending on the destination country’s requirements.
Do I need a health certificate for my pet to fly domestically?
While airline policies vary, many airlines require a health certificate for domestic flights, and some states require them by law regardless of airline policy. I always get a health certificate from my veterinarian before every flight, even when not strictly required, because it provides documentation that my dog is healthy and fit to fly. Most airlines and states that require health certificates specify they must be issued within 10 days of travel. The certificate confirms your pet has been examined by a licensed veterinarian, is free from contagious diseases, and is current on vaccinations (specifically rabies). During my veterinary visit, I also request copies of all vaccination records, which I keep organized in a clear document pouch alongside the health certificate. Some airline agents check these documents carefully while others barely glance at them, but having proper documentation prevents the nightmare scenario of being denied boarding. I keep both physical copies and digital photos of all documents accessible on my phone as backup.
What size carrier do I need for my pet to fly in-cabin?
Carrier size requirements vary by airline, but most require carriers that fit under the seat in front of you, typically with maximum dimensions around 18 inches long × 11 inches wide × 11 inches high, though this varies by aircraft type. I learned the hard way that you need to check your specific airline’s requirements and even your specific aircraft, because regional jets have smaller under-seat spaces than larger planes. The Sherpa Original Deluxe Airline-Approved Pet Carrier has been my go-to because it comes in multiple sizes and the soft-sided design provides some flexibility to squeeze under tight spaces while maintaining structure. When measuring your pet for a carrier, they should be able to stand up, turn around, and lie down comfortably inside. I measure my dog from nose to base of tail for length, floor to top of head (standing) for height, and widest point for width, then add 2-3 inches to each measurement for comfort. Most airlines also have combined pet and carrier weight limits (typically 20 pounds total), so I always weigh my dog in the carrier before heading to the airport to ensure we’re within limits.
Can I take my pet out of the carrier during the flight?
No, airline policies strictly prohibit removing pets from their carriers during flights, and I’ve seen flight attendants enforce this rule consistently. Your pet must remain in their carrier, which stays under the seat in front of you, for the entire flight including taxi, takeoff, flight, and landing. This is a safety requirement—loose animals during turbulence or emergencies could be injured or could interfere with evacuation procedures. During one of my early flights, I saw a passenger ask to hold their small dog during turbulence to comfort them, and the flight attendant firmly explained the policy and the safety reasons behind it. This is why comfort items are so important—I pack a familiar blanket and small toy in the carrier so my dog feels secure even though I can’t hold her. I can talk to my pet through the carrier mesh, discretely offer treats through the door opening, and slip my fingers through for comfort, but the carrier must remain zipped. The only exception is service animals, which travel as working animals under different regulations, not as pets.
How do I get through TSA security with my pet?
Getting through TSA security with a pet initially stressed me out, but I’ve now done it dozens of times and have a system that works smoothly. When you reach the security checkpoint, notify the TSA officer that you’re traveling with a pet. You have two options: send the empty carrier through the X-ray machine while you carry your pet through the metal detector, or have TSA conduct a physical inspection of the carrier with your pet inside if your pet cannot be removed for safety reasons. I always choose the first option. Here’s my exact process: I remove my dog from the carrier before reaching the conveyor belt, attach my Mighty Paw Retractable Dog Leash (which I keep clipped to her harness the entire time as a safety backup), collapse the empty carrier flat, and send it through the X-ray machine along with my bags. Then I carry my dog through the metal detector (making sure no metal leash clips or harness parts set off the alarm—I use the chest attachment on the Ruffwear Web Master Harness which has minimal metal). Once through, I immediately place my dog back in the carrier on the other side before gathering my belongings. The entire process takes about 30 seconds once you’ve done it a few times. I always use a pet relief area before security so my dog has just gone to the bathroom and is less likely to have accidents during this stressful process.
What calming products actually work for anxious pets on flights?
After trying numerous calming products for my anxious rescue dog, I’ve found that a combination approach works best. My go-to combination includes the Thundershirt Classic Anxiety Wrap, which I put on my dog about 30 minutes before heading to the airport—the gentle pressure provides consistent calming throughout travel. I spray Adaptil Travel Calming Spray (for dogs) or Feliway (for cats) inside the carrier about 15 minutes before placing my pet inside, which releases calming pheromones that take the edge off anxiety. I also give VetriScience Composure Calming Chews starting two days before travel and continuing through travel day, which contain L-theanine and other calming ingredients. For my dog, this combination noticeably reduces shaking, panting, and restlessness. I’m honest that these products reduce anxiety but don’t eliminate it completely—they take a severely anxious pet down to manageable anxiety levels. For pets with extreme anxiety, I strongly recommend consulting your veterinarian about prescription anti-anxiety medications like trazodone or gabapentin, which can be more effective for severe cases. I did a trial run with any new calming product at home weeks before travel to see how my pet responded and ensure there were no adverse reactions. It’s critical to note that pets traveling in cargo cannot be sedated because sedation affects their ability to regulate body temperature and breathing at altitude, which can be dangerous.
How do I find pet-friendly hotels at my destination?
Finding genuinely pet-friendly hotels has become much easier with specialized apps and websites. My essential tool is BringFido, which is basically the Yelp of pet travel. I open the app, enter my destination, and immediately see all pet-friendly hotels, vacation rentals, restaurants, and attractions in the area. What I love about BringFido is the detailed information—not just “pet-friendly” but specific details about pet fees (some charge per night, others charge or more), weight limits, number of pets allowed, and amenities like fenced dog parks or pet concierge services. The real reviews from other pet owners are invaluable because they share honest experiences about whether hotels truly welcomed pets or merely tolerated them. I always filter by “no pet fees” when possible to save money, and I read recent reviews to ensure policies haven’t changed. Beyond BringFido, I check hotel websites directly because sometimes they offer better rates or waive pet fees for direct bookings or loyalty members. I also call hotels to confirm pet policies before booking because online information isn’t always current. When I arrive, I always ask for ground-floor rooms near exits for easy bathroom breaks, and I request rooms away from elevators to minimize noise that might stress my pet. I keep a list of nearby veterinary emergency clinics saved in my phone before travel, which I find through Rover or by searching “emergency vet near me” once I arrive.
What’s the difference between service animals and emotional support animals on flights?
This is an important distinction that’s changed significantly in recent years. Service animals are working animals (typically dogs) that have been individually trained to perform specific tasks for people with disabilities—examples include guide dogs for blind individuals, hearing dogs for deaf individuals, or dogs trained to alert to seizures or diabetic episodes. Service animals are not pets and are allowed in aircraft cabins under the Air Carrier Access Act without pet fees because they’re medical equipment. They don’t need to be in carriers and typically sit at their handler’s feet. Airlines can require documentation of training and behavior. Emotional support animals (ESAs), on the other hand, provide comfort through their presence but aren’t trained to perform specific disability-related tasks. As of 2021, most U.S. airlines (including Delta, American, United, and Southwest) no longer recognize emotional support animals as distinct from pets, following Department of Transportation rule changes. This means ESAs must now travel as regular pets—in carriers under seats (if small enough) with pet fees, or in cargo (if larger), following all standard pet travel rules. Before 2021, ESAs could travel in-cabin without fees or carriers, which led to widespread abuse of the system and the eventual policy changes. Regular pets travel under standard airline pet policies with fees, carrier requirements, and booking limitations. I mention this because I’ve encountered confusion at airports from travelers who believed their ESA letter would allow free cabin travel, only to be told at check-in that their animal must follow pet policies. If you have a legitimate service animal, definitely understand your rights and proper documentation requirements, but be aware that airlines can ask specific questions about your animal’s training and deny transport to animals that aren’t properly trained or behaved.
Should I feed my pet before a flight?
Based on veterinary recommendations and my personal experience, I’ve developed a feeding strategy that minimizes accidents and stomach upset during flights. I feed my dog a light meal 3-4 hours before departure—about half her normal portion—which gives her enough time to digest and have bathroom breaks before boarding but prevents her from flying on a completely empty stomach (which can cause nausea in some pets). I avoid feeding a full meal because full stomachs during the stress of travel and the altitude changes during flight can lead to vomiting or diarrhea. I always offer plenty of water up until about 1-2 hours before departure, then just small amounts of water until boarding to minimize bathroom needs during flight. During the flight itself, I do not feed my pet, though I offer small treats occasionally for comfort and positive reinforcement. If we have a layover longer than 4 hours, I’ll offer small amounts of food and water in a pet relief area—I use my Comsun Collapsible Silicone Travel Bowls which are perfect for this. Once we arrive at our final destination, I wait about 30 minutes to an hour to let my dog settle and have a bathroom break, then feed a normal meal. For pets traveling in cargo (which I try to avoid but sometimes is necessary for large dogs), I follow airline instructions carefully—most recommend not feeding for several hours before cargo travel and providing ice cubes instead of water bowls so pets stay hydrated without water spilling during loading. I always pack extra food in my checked baggage in case of delays or cancellations that extend our trip unexpectedly.
Can I fly with multiple pets at the same time?
Airline policies on flying with multiple pets vary significantly, and this is something I always verify when booking. Most airlines allow only one pet carrier per passenger in-cabin, though some (like American Airlines) allow two small pets in the same carrier if they’re compatible and the combined weight stays within limits. I’ve never personally traveled with two pets simultaneously in-cabin, but I have friends who do, and they report that airlines are strict about this—two carriers means you need a second ticketed passenger. Some travelers book a second seat for a second pet carrier, though not all airlines permit this. For cargo travel, airlines typically allow multiple pets as long as each has their own appropriately-sized kennel and you’ve booked spots for each (cargo space is limited and must be reserved). The fees multiply—if in-cabin costs 5 each way, two pets would cost 0 each way. From a practical perspective, I find traveling with one pet challenging enough between managing carriers, documents, feeding schedules, and bathroom breaks. Managing two or more pets through security, during layovers, and on flights would be exponentially more difficult. If you must travel with multiple pets, I recommend having a second adult along to help manage logistics, booking direct flights to avoid the chaos of multiple airport pet relief area visits, and being absolutely certain your pets are comfortable traveling together (the last thing you want is fighting or distress in carriers during flights).
What happens if my pet has an accident in their carrier during the flight?
Accidents happen, and I’ve learned to prepare for this possibility even though it hasn’t happened to me yet (thankfully). My prevention system starts with always using a pet relief area immediately before going through security and again just before boarding (most airports have designated pet relief areas near gates). Inside the carrier, I layer Paw Inspired Puppy Pads on the bottom, then place a familiar blanket on top. If an accident occurs, I can discretely remove the soiled blanket through the carrier opening, leaving the puppy pad underneath to absorb moisture and contain odor. I keep extra puppy pads in an easily accessible pocket of my personal bag so I can add fresh padding. I also pack pet-safe cleaning wipes and paper towels for cleanup. The worst-case scenario would be a more significant accident that requires removing the pet from the carrier to clean—in this situation, I would discreetly notify a flight attendant and ask to use the lavatory for cleanup. I’d bring my small collapsible bowl and cleaning supplies, thoroughly clean my pet if needed, replace all bedding, and get back to my seat as quickly as possible. Having the Ruffwear Web Master Harness with secure leash attached throughout the flight (even while in the carrier) means if I absolutely must remove my pet briefly, I have secure control. To minimize accident risk, I limit water in the 1-2 hours before boarding, stick to my feeding schedule (light meal 3-4 hours before departure), and consider calming products that reduce anxiety-related accidents. For pets prone to accidents, some owners use belly bands (for male dogs) or even consult veterinarians about temporary medications that reduce urination frequency during travel, though I haven’t needed these solutions personally.
How far in advance should I book flights when traveling with my pet?
I recommend booking flights with your pet as early as possible—ideally 2-3 months in advance for domestic travel and even earlier for international trips. Here’s why this matters: airlines strictly limit the number of pets allowed per flight (typically 4-7 pets in-cabin depending on aircraft size), and these spots are first-come, first-served. Popular routes, holiday travel periods, and flights to pet-friendly destinations fill up quickly. I learned this the hard way when I tried booking a flight to a dog-friendly beach town just three weeks before travel and discovered every direct flight was full for pets, forcing me to book a more expensive route with connections. When you book flights, you must call the airline directly to reserve your pet’s spot—you cannot book pet travel through most online booking systems. During this call, I always confirm the pet fee amount, carrier size restrictions for my specific aircraft, and that the pet reservation is actually noted in my booking. I ask for a confirmation number specific to the pet reservation and document the phone agent’s name and date. I also immediately book my vet appointment for the health certificate, timing it for 7-10 days before travel (most certificates are valid for 10 days). If booking international travel, I start the process even earlier—sometimes 4-6 months ahead—because some countries require waiting periods after certain vaccinations or treatments, and import permits can take weeks or months to process. Early booking also gives me time to properly train my pet to be comfortable in their carrier, gradually acclimating them over weeks instead of forcing them into an unfamiliar carrier the day of travel.
Are there breeds that aren’t allowed to fly?
Yes, unfortunately many airlines have breed restrictions, and this varies significantly by carrier. Most airlines restrict or ban brachycephalic breeds (short-nosed dogs and cats) including Bulldogs, Pugs, Boston Terriers, Boxers, Shih Tzus, Persian cats, and similar breeds due to their increased risk of respiratory distress during flight, which can be dangerous. These breeds have restricted airways that make breathing difficult under stress, altitude, and temperature extremes. Some airlines ban these breeds entirely from cargo, while others allow them in-cabin only, and a few allow them with veterinary certification of health. Beyond brachycephalic breeds, some airlines restrict or ban breeds considered dangerous, typically including Pit Bulls, Rottweilers, Dobermans, Mastiffs, and wolf hybrids, though policies vary widely and some airlines have eliminated breed restrictions entirely. Delta and United maintain breed restriction lists that they update periodically, while Southwest is generally